Battery switch on travel trailer function is crucial for managing your RV’s power. This guide dives into the intricacies of these switches, covering everything from understanding their different types and wiring configurations to troubleshooting common problems and ensuring safe operation. We’ll explore how these switches interact with other RV systems like solar panels and generators, helping you confidently manage your travel trailer’s power needs.
Whether you’re a seasoned RVer or a newbie, this comprehensive guide will empower you to understand and maintain your battery switch system effectively.
We’ll cover various types of battery switches, their wiring diagrams, common issues and how to troubleshoot them, and best practices for maintenance and safety. By the end, you’ll be equipped to select the right switch for your needs, confidently connect it to other systems, and ensure the safe and efficient operation of your travel trailer’s electrical system.
Understanding Battery Switch Functionality in Travel Trailers
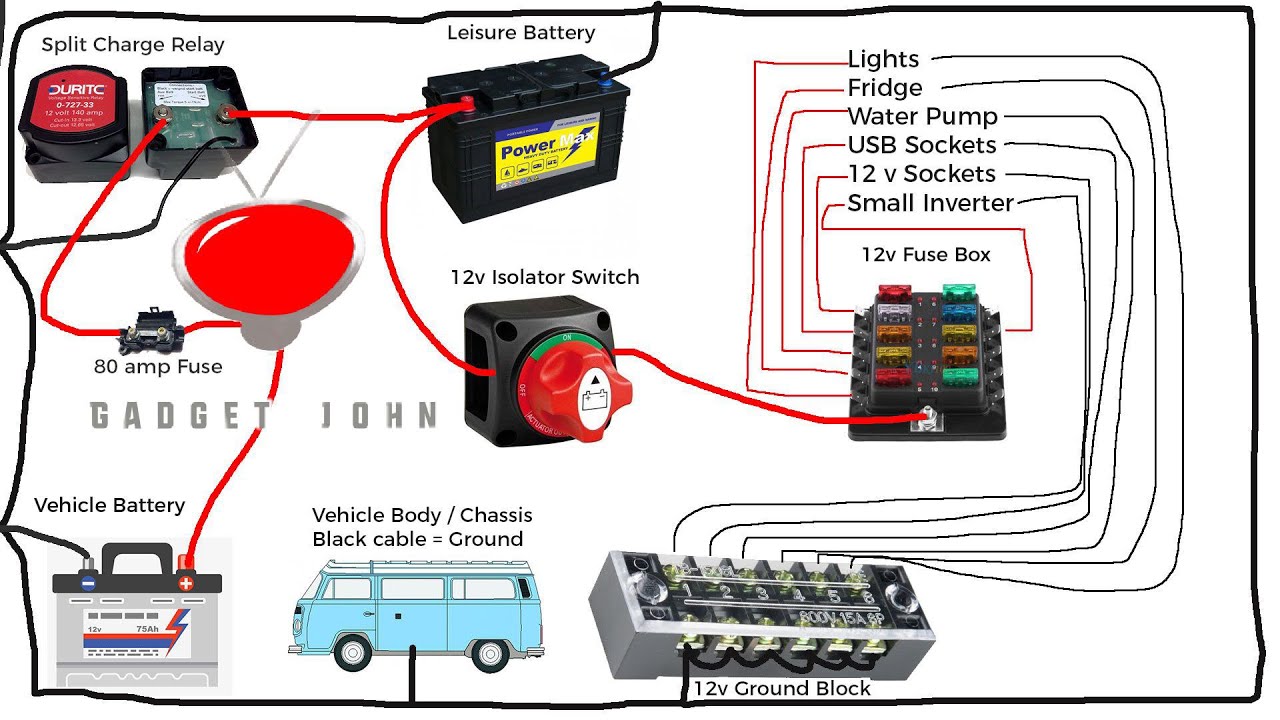
Your travel trailer’s battery switch is a crucial component for managing power from your house batteries (powering your interior lights, appliances, etc.) and your chassis battery (powering your engine starting system). Understanding how it works is key to avoiding dead batteries and ensuring a smooth camping experience.
A properly functioning battery switch allows you to isolate and control power flow between your batteries, preventing accidental drain from one to the other. This is especially important if you’re storing your trailer for extended periods or if you have separate battery banks for different systems.
Types of Battery Switches
Travel trailers typically utilize one of two main types of battery switches: a simple on/off switch or a more sophisticated multi-position switch. Simple on/off switches offer the most basic functionality – either connecting both batteries together or completely disconnecting them. Multi-position switches, often called selector switches, provide more control, allowing you to connect either the house batteries, the chassis battery, both, or neither.
So, you’re an audiophile who loves to travel? Awesome! Check out this guide on setting up your audiophile travel setup for amazing sound on the go. Knowing how to manage your power is key, especially if you’re using a travel trailer. Understanding the battery switch on travel trailer function will prevent dead batteries and keep your tunes playing all day long.
It’s all about maximizing your enjoyment, whether you’re listening to your favorite vinyl or streaming your latest playlist.
Some even incorporate a “battery combiner” function, automatically connecting the batteries for charging.
Purpose of a Battery Switch in Managing Power
The primary purpose of a battery switch is to prevent unwanted discharge. Imagine leaving your interior lights on while your trailer is disconnected from shore power. Without a battery switch, your chassis battery could be drained, leaving you unable to start your tow vehicle. The switch prevents this cross-drain by allowing you to isolate the house and chassis batteries.
It also allows you to charge both battery banks separately or simultaneously, depending on the switch type and wiring configuration. Furthermore, it allows for easier maintenance and troubleshooting by enabling you to disconnect individual battery banks as needed.
Typical Wiring Configuration of a Battery Switch System
The wiring configuration varies slightly depending on the switch type and the trailer’s electrical system complexity. However, a common setup involves positive cables from each battery running to the switch, and then a separate output cable from the switch going to the house load center or other power distribution points. Negative battery cables are typically connected directly to the chassis ground, often with a separate ground connection for the house system.
Diagram Illustrating Power Flow
The following diagram depicts a typical power flow through a multi-position battery switch. This is a simplified representation and may vary based on your specific trailer’s setup.
| Component | Description | Switch Position | Power Flow |
|---|---|---|---|
| Chassis Battery (+) | Positive terminal of the chassis battery. | Any position | Always connected to the switch |
| House Battery (+) | Positive terminal of the house battery. | Both, House | Connected to the switch and the load center |
| Battery Switch | The multi-position switch controlling power flow. | Off, Chassis, House, Both | Directs power flow based on the selected position |
| Load Center | Distribution point for house power. | Both, House | Receives power from the house battery via the switch |
| Chassis Load | Components powered by the chassis battery (e.g., starting system). | Any position except Off | Always receives power from the chassis battery (except Off position) |
| Ground (-) | Ground connections for both batteries and the load center. | All positions | Completes the electrical circuit |
Troubleshooting Common Battery Switch Issues
Your travel trailer’s battery switch is a critical component, and problems can leave you stranded. Understanding common issues and how to troubleshoot them can save you time and frustration. This section will guide you through diagnosing and resolving some typical problems.Troubleshooting battery switch problems often involves checking for power, inspecting fuses, and testing the switch itself and its wiring.
Always prioritize safety when working with electrical systems.
Identifying Common Battery Switch Problems
Several issues can arise with your travel trailer’s battery switch. The most frequent include a complete lack of power to the trailer’s 12-volt system, blown fuses in the battery switch circuit, or intermittent power loss. A faulty switch itself can also cause problems, leading to inconsistent power supply or even a complete failure. Finally, corroded connections or damaged wiring can significantly disrupt power flow.
Proper diagnosis requires a systematic approach.
Testing the Battery Switch with a Multimeter
Before you begin, ensure the power to the battery is disconnected. This is a crucial safety precaution. You’ll need a multimeter set to measure DC voltage.First, check the voltage directly at the battery terminals. You should see approximately 12-13.5 volts if the battery is fully charged. If the voltage is significantly lower, the battery itself may be the problem.Next, test the voltage at the output terminals of the battery switch.
If the voltage is present at the battery but not at the switch output, the switch itself or the wiring between the battery and the switch is faulty. If the voltage is low at the output, there’s a problem with the switch, its wiring, or a fuse.Finally, check the continuity of the switch. Set your multimeter to the continuity setting (usually represented by a diode symbol).
Touch the probes to the input and output terminals of the switch. A continuous tone indicates a good connection. No tone suggests a faulty switch.
Diagnosing Wiring Problems Related to the Battery Switch
Inspect all wiring connected to the battery switch carefully. Look for any signs of damage, such as frayed wires, corrosion, or loose connections. Pay close attention to the positive (+) and negative (-) wires. A visual inspection can often reveal the source of the problem.If you find damaged wiring, repair or replace it immediately. Use appropriately sized wire and ensure all connections are secure and corrosion-free.
Consider using wire nuts or crimp connectors for reliable connections. Remember to always disconnect the power source before working on any electrical wiring.
Safety Precautions When Working with RV Electrical Systems
Working with RV electrical systems requires caution. Always disconnect the power source (both the battery and shore power) before performing any maintenance or repairs. Never work on a wet or damp surface. Wear appropriate safety glasses and gloves to protect yourself from potential hazards. If you are not comfortable working with electrical systems, consult a qualified RV technician.
Improper handling can lead to serious injury or damage to your equipment.
So, you’re an audiophile who loves to travel? Awesome! Check out this guide on setting up your audiophile travel setup for amazing sound on the go. It’s all about portability without sacrificing quality. Then, if you’re hitting the road in an RV, understanding your battery switch on travel trailer function is crucial for keeping your gadgets powered up.
Knowing how to manage your power is just as important as having great tunes!
Selecting the Right Battery Switch for Your Travel Trailer
Choosing the right battery switch for your travel trailer is crucial for safe and reliable power management. The wrong switch can lead to overheating, damage to your batteries, or even a fire. This section will help you navigate the different types of switches and select the best one for your needs.Choosing a battery switch involves understanding the different types available and matching their capabilities to your trailer’s power demands.
The primary factors influencing your decision are the number of batteries, the amperage draw of your appliances, and your budget.
Types of Battery Switches
There are several types of battery switches available for travel trailers, each with its own advantages and disadvantages. The most common are:
- Single Battery Switches: These switches control a single battery bank, commonly used in trailers with a single 12V battery. They are simple, inexpensive, and easy to install. However, they don’t offer the flexibility of multiple-battery systems.
- Dual Battery Switches: These switches allow you to control two separate battery banks independently. This is useful for trailers with a house battery and a starting battery, allowing you to isolate one while charging or using the other. They offer more flexibility than single switches but still lack some advanced features.
- Rotary Battery Switches: These switches are typically manually operated and offer multiple positions, allowing for different combinations of battery connections. They’re relatively simple and reliable but can be less convenient than other options, especially in inclement weather.
- Electronic Battery Switches: These switches offer automated control, often including features like remote operation and low-voltage cutoff. They’re more expensive than manual switches but provide greater convenience and safety. Some models offer monitoring capabilities, providing valuable information about battery state of charge.
Decision-Making Flowchart for Battery Switch Selection
To help you choose the right battery switch, consider this simplified flowchart:
- Do you have one or two battery banks? One bank: Go to step
3. Two banks
Go to step 2.
- Do you need independent control of each bank? Yes: Choose a dual battery switch (rotary or electronic). No: Go to step 3.
- What is your budget and desired level of convenience? Limited budget and prioritize simplicity: Choose a single battery switch (rotary). Higher budget and want more convenience and features: Choose an electronic switch.
Factors to Consider When Upgrading or Replacing a Battery Switch, Battery switch on travel trailer function
Before upgrading or replacing your battery switch, consider these important factors:
- Amperage rating: The switch must handle the maximum current draw of your appliances and charging system. A switch with insufficient amperage will overheat and potentially fail.
- Number of batteries: The switch must accommodate the number of batteries in your system.
- Type of batteries: Ensure the switch is compatible with the type of batteries you’re using (e.g., lead-acid, lithium).
- Mounting location: Consider the available space and accessibility for installation.
- Budget: Compare prices and features to find a switch that fits your needs and budget.
Implications of Insufficient Amperage Capacity
Choosing a battery switch with insufficient amperage capacity is a serious issue. The switch will overheat, potentially melting the internal components and causing a fire hazard. In less severe cases, the switch may simply fail, leaving you without power. Always choose a switch with an amperage rating significantly higher than the expected maximum current draw of your system – a safety margin is crucial.
For example, if your maximum draw is 100 amps, consider a switch rated for at least 150 amps to account for surges and ensure long-term reliability.
Battery Switch Maintenance and Upkeep
Regular maintenance of your travel trailer’s battery switch is crucial for ensuring reliable power and extending the lifespan of your batteries and the switch itself. Neglecting this can lead to corrosion, poor connections, and ultimately, system failure. A simple, consistent maintenance schedule can prevent these problems and keep your trailer running smoothly.Proper maintenance involves a combination of regular inspections, cleaning, and careful handling during disconnection and reconnection.
This section details a practical approach to keeping your battery switch in top condition.
Regular Maintenance Schedule
A good rule of thumb is to inspect your battery switch and terminals at least every three months, or more frequently if you’re using your trailer extensively or storing it in a damp environment. This inspection should include a visual check for corrosion, loose connections, and any signs of damage. More thorough cleaning and tightening should be done at least once a year.
Before each camping trip, a quick visual inspection is also recommended. This preventative approach minimizes the chances of encountering electrical problems while you are away from home.
Cleaning and Inspecting Battery Switch Terminals
Corrosion is the enemy of electrical connections. To clean the terminals, you’ll need a wire brush, baking soda, and water. First, disconnect the battery switch (see the section below on disconnection). Then, use the wire brush to remove any corrosion buildup from both the battery switch terminals and the battery terminals. Mix a paste of baking soda and water, apply it to the terminals, and let it sit for a few minutes to neutralize any acid residue.
Scrub again with the wire brush, rinse thoroughly with clean water, and allow the terminals to dry completely before reconnecting. Inspect the terminals for any cracks or damage; replace the switch if necessary. Apply a thin layer of dielectric grease to the cleaned terminals to prevent future corrosion. This grease acts as a barrier, protecting the metal from moisture and preventing oxidation.
Preventative Maintenance Tips
Several preventative measures can significantly extend the life of your battery switch. Regularly inspect the connections for tightness. Loose connections create resistance and can lead to overheating and damage. Avoid over-tightening, which can strip the threads or damage the terminals. Store your trailer in a dry place whenever possible to minimize exposure to moisture.
Consider using a battery disconnect switch cover to further protect the terminals from the elements. Finally, choose a high-quality battery switch from a reputable manufacturer, as this is the foundation of a reliable system.
Proper Disconnection and Reconnection of the Battery Switch
Before disconnecting the battery switch, always turn off all power to the trailer. This is a crucial safety precaution to prevent electrical shocks or accidental short circuits. Next, disconnect the negative (-) terminal first, then the positive (+) terminal. This order minimizes the risk of accidental short circuits. When reconnecting, reverse the process: connect the positive (+) terminal first, then the negative (-) terminal.
Remember to always double-check that all connections are secure and properly tightened before turning the power back on. If you are unsure about any aspect of this process, consult a qualified RV technician.
Integrating Battery Switches with Other RV Systems: Battery Switch On Travel Trailer Function

Your travel trailer’s battery switch isn’t just a simple on/off switch; it’s a crucial component in managing power flow between your batteries and other electrical systems. Understanding its interaction with solar panels, inverters, and shore power is essential for safe and efficient RV operation. Proper integration ensures you maximize your energy resources and avoid potential damage to your equipment.Your battery switch acts as the central control point, determining which power source feeds your RV’s house batteries and which systems are drawing power from them.
This control is especially important when switching between different power sources to prevent backfeeding and potential damage. It allows for selective use of your batteries, preventing unwanted discharge, or enabling charging from various sources.
Solar Panel Integration
Connecting your solar panels to your battery system requires careful consideration of the battery switch’s role. Ideally, the solar charge controller should be wired
- after* the battery switch, but
- before* the batteries. This setup allows you to completely disconnect your batteries from the rest of the system when the switch is off, preventing accidental discharge. However, the solar charge controller itself usually includes a built-in safety mechanism to prevent backfeeding. A common configuration involves the solar panels feeding into the charge controller, which then connects to the positive (+) terminal of the battery, while the negative (-) terminal connects directly to the battery and is then part of the circuit to the battery switch.
If your solar system has a charge controller with a built-in disconnect, you can turn off your solar panel power without needing to use the battery switch.
Power Flow in Various Scenarios
The following table illustrates how power flows through your system in different operating modes. Note that this is a simplified representation, and the specifics may vary depending on your RV’s wiring and equipment.
| Scenario | Shore Power | Generator | Solar Charging | Battery Switch |
|---|---|---|---|---|
| Shore Power Connected | On, charging batteries | Off | Off (or charging batteries if configured to) | On |
| Generator Running | Off | On, charging batteries | Off (or charging batteries if configured to) | On |
| Solar Charging Only | Off | Off | On, charging batteries | On |
| All Systems Off | Off | Off | Off | Off |
Safety Considerations When Using a Battery Switch
Working with batteries and electrical systems in your travel trailer requires caution. Improper use of a battery switch can lead to serious consequences, including electrical shocks, fires, and even explosions. Understanding and following safety guidelines is crucial to prevent accidents and ensure the longevity of your RV’s electrical system.Battery switches, while convenient, introduce potential hazards if mishandled. Incorrect switching can cause short circuits, leading to overheating and potential fires.
Furthermore, working with lead-acid batteries exposes you to corrosive acid and potentially explosive hydrogen gas. These risks are easily mitigated with proper procedures and safety equipment.
Risks Associated with Improper Battery Switch Use
Improper use of a battery switch can result in several dangerous situations. A common mistake is accidentally connecting the house batteries to the chassis battery while the engine is running, potentially damaging sensitive electronics or even causing a fire due to overvoltage. Another risk is failing to properly isolate batteries before performing maintenance, leading to accidental shocks or short circuits.
Finally, neglecting to switch off the batteries when the RV is stored for extended periods can lead to battery drain and potential damage.
Safety Guidelines for Handling Batteries and Electrical Systems
Safe battery handling begins with preparation. Always wear appropriate safety gear, including safety glasses to protect your eyes from splashes of battery acid, and gloves made of rubber or a similar insulating material to protect your hands from corrosion and electrical shock. Ensure the area is well-ventilated to avoid the build-up of explosive hydrogen gas. Before working on any electrical component, always disconnect the negative terminal first to prevent accidental short circuits.
When connecting or disconnecting batteries, make sure the terminals are clean and free of corrosion. Finally, use insulated tools to prevent accidental shocks.
Importance of Using Appropriate Safety Equipment
Safety equipment is not optional when working with batteries and electrical systems. Rubber gloves provide insulation against electrical shocks and protect your hands from corrosive battery acid. Safety glasses shield your eyes from acid splashes and flying debris. Insulated tools further minimize the risk of electrical shock. Ignoring these precautions can lead to serious injury or damage to equipment.
Investing in high-quality safety equipment is a small price to pay for the protection it provides.
Battery Switch System Safety Checklist
Before using your battery switch:
- Inspect the battery switch for any signs of damage or corrosion.
- Ensure the area is well-ventilated.
- Put on safety glasses and rubber gloves.
- Visually inspect the batteries for any leaks or damage.
- Verify that all connections are secure and free of corrosion.
- Double-check the switch position before turning on any electrical appliances.
- After completing any work on the electrical system, double-check that all connections are secure and that the battery switch is in the correct position.
Mastering your travel trailer’s battery switch is key to a smooth and enjoyable RV experience. Understanding its function, performing regular maintenance, and prioritizing safety will ensure reliable power and prevent costly repairs. By following the tips and advice provided in this guide, you’ll be well-equipped to handle any battery switch-related challenges and enjoy the freedom of the open road with confidence.
Remember, proper understanding and maintenance are crucial for a safe and worry-free RV experience.
FAQ Overview
What happens if I accidentally switch off the battery while driving?
This depends on your setup. If your chassis battery (powering your engine) is separate, nothing will happen. If it’s connected through the switch, your engine will likely stall.
How often should I clean my battery switch terminals?
At least once a year, or more often if you notice corrosion.
Can I use a battery switch with higher amperage than my system needs?
Yes, it’s generally fine; a higher amperage switch won’t hurt, but a lower one could be dangerous.
What type of multimeter do I need to test my battery switch?
A basic multimeter with DC voltage and continuity testing capabilities is sufficient.
